The Open Graph meta tags were the social media meta tags for Facebook. These tags help you to make your blog post a rich object in the social media world. In short, when someone shares your blog post, the shared item looks better on Facebook. It works as Twitter card for twitter works.
If you share your post on Facebook without setting up open graph tags, it will look like this:


Which is not an impressive piece of content. Most probably a social media user will ignore this, instead of sharing or clicking it, But if you add the Facebook open graph meta tags, your posts will looks like this:

This is more likely to get clicked and shared by users, so if you want to setup Facebook's open graph social media meta tags protocol to your blogger just follow the given step by step instructions with images.
Those users who get a wrong image (or a wrench img) on sharing the post on Facebook should also follow the given steps.
How To Implement Open Graph Meta Tags in Blogger
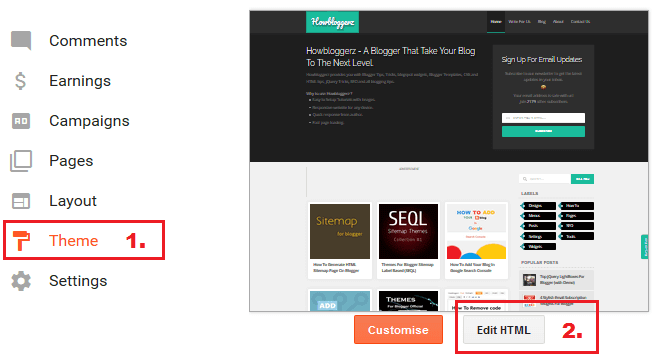
Step 1. Log in to your Blogger account, then goto Themes > Edit HTML.

Step 2. Click anywhere inside the code, and then search for the following code (Use CTRL+F):
<htmlStep 3. Add below code at the end of searched code before close tag '>'.
xmlns:og='http://ogp.me/ns#'Step 4. Again search for the following code:
<b:include data='blog' name='all-head-content'/>Step 5. Add this code just below it:
<meta content='article' property='og:type'/>
<b:if cond='data:blog.url == data:blog.homepageUrl'>
<meta content='[homepage Image URL]' property='og:image'/>
<meta content='[homepage Image Width]' property='og:image:width' />
<meta content='[homepage Image Height]' property='og:image:height' />
</b:if>
<meta expr:content='data:blog.title' property='og:site_name'/>
<meta content='[Facebook profile Id]' property='fb:admins'/>
<b:if cond='data:blog.pageType == "item"'>
<meta content='https://www.facebook.com/username' property='article:author'/>
</b:if>
<meta content='en_US' property='og:locale'/>
Note: Open graph Tags for post "URL", "image", "description" and "title" are already there by default, so no need to add them again.
Step 5. Configuration:
Note: Recommended Image dimensions for better output in Facebook post: 1200 x 630px
- Replace
[homepage Image URL]with the URL of the image for homepage. - Replace
[homepage Image Width]with the Width of the homepage Image. - Replace
[homepage Image Height]with the Height of the homepage Image.
For Height and Width, Use only numeric value like '1200' or '630') - Replace [Facebook profile Id] with your Facebook profile id. To get your profile id Click here.
- Replace
usernamewith your Facebook username. - (Optional) Here en_US is the language_TERRITORY that is US-English if your blog is in different language replace it. For language code details click here .
Note: This image will be shown when you will share your main blog address or homepage on Facebook.
Read: How to Upload and Get Image URL
To find your username visit your Facebook profile, Then check your address bar.
It’ll look like https://www.facebbok.com/username
If you have not set the username yet it may look like:
https://www.facebook.com/profile.php?id=some-random-number
You can replace the above URL with this or you can create your username by visiting your Facebook's settings.
Step 6. Click Save theme.
That's it !
Now, your shared post on Facebook will become a rich object with beautiful appearance. You can also setup Twitter card in the same way. If you have any issue use Facebook open graph, Use this Facebook Debugging tool or comment below. Stay Updated, Browse Howbloggerz! :)

إرسال تعليق